
Lab 10-5 install a network printer – Embarking on Lab 10-5: Install a Network Printer, we delve into the realm of networking, exploring the intricacies of connecting printers to a shared network. This lab provides a comprehensive overview of the process, guiding you through the necessary steps to establish a seamless printing experience.
With a focus on clarity and precision, this guide empowers you with the knowledge and skills to navigate the complexities of network printer installation. Whether you’re a seasoned IT professional or a novice user, this lab will equip you with the confidence to tackle this task efficiently.
Lab Overview
This lab introduces the installation process of a network printer. Upon completion, students will gain hands-on experience in configuring and troubleshooting printer connectivity within a network environment.
Learning Objectives:
- Understand the principles of network printing.
- Install and configure a network printer.
- Troubleshoot common network printer issues.
Equipment and Materials: Lab 10-5 Install A Network Printer

Required Equipment:
- Computer with an Ethernet port
- Network printer
- Ethernet cable
Materials:
- Printer driver software (typically provided on a CD or available for download from the manufacturer’s website)
Safety Precautions
Potential Hazards:
- Electrical shock from the printer or power cable
- Fire hazard from overheating
Safety Protocols:
- Ensure that the printer is properly grounded.
- Do not overload the printer’s electrical outlet.
- Keep the printer away from flammable materials.
Procedure
Step 1: Connect the Printer to the Network
Use an Ethernet cable to connect the printer to a LAN port on the router or switch.
Step 2: Install the Printer Driver
Insert the printer driver CD or download the driver software from the manufacturer’s website.
Follow the on-screen instructions to install the driver.
Step 3: Configure the Printer
Open the Control Panel on your computer.
Select “Printers and Faxes” or “Devices and Printers” depending on your operating system.
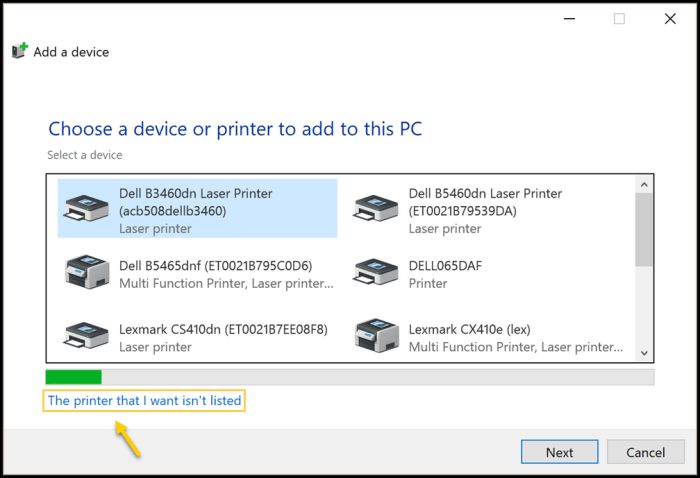
Click on “Add a printer” or “Add a device”.
Select “Network printer” or “Wireless printer”.
Follow the on-screen instructions to complete the configuration.
Troubleshooting
Common Problems:
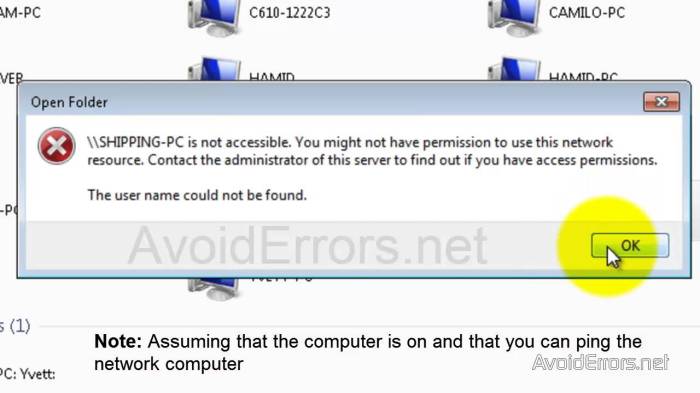
- Printer not detected:Ensure that the printer is connected to the network and powered on. Check the Ethernet cable and LAN port connections.
- Printing issues:Verify that the printer has paper and ink. Check the printer queue for any error messages.
- Network connectivity issues:Run a network diagnostic test on your computer. Check the router or switch for any configuration issues.
Lab Report

Format:
- Introduction: Briefly describe the purpose and objectives of the lab.
- Materials and Methods: List the equipment and materials used, and describe the steps taken to install the network printer.
- Results: Describe the outcome of the installation and any troubleshooting steps taken.
- Discussion: Explain the principles of network printing and discuss the potential applications of this technology.
- Conclusion: Summarize the key findings of the lab and discuss any future research directions.
Content:
- Clear and concise language.
- Accurate and detailed descriptions of the procedures.
- Relevant images or diagrams to illustrate the process.
- Proper citations for any sources used.
Essential Questionnaire
What are the prerequisites for installing a network printer?
Before proceeding, ensure you have a compatible printer, network connectivity, and the necessary software and drivers.
How do I troubleshoot network printer connection issues?
Check network connectivity, verify IP addresses, and ensure proper driver installation. If problems persist, consult the printer’s user manual or seek technical support.
